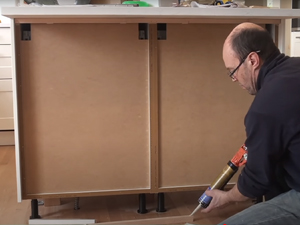
Picture this: you’re in your dream kitchen, a spacious haven brimming with culinary potential. The centerpiece, a magnificent island, stands proudly, offering a hub for prepping meals, gathering with loved ones, and showcasing your culinary creativity. But have you ever stopped to wonder how this majestic structure is secured to the floor? It’s a question that might have crossed your mind during a kitchen remodel or while daydreaming about your ideal culinary space. Today, we’ll delve into the fascinating world of kitchen island attachments, unveiling the secrets behind their stability and durability.

Image: uniquedesignblog.com
The kitchen island, a versatile addition to modern kitchens, offers a blend of functionality and style. Its ability to seamlessly integrate with the layout, providing extra counter space, storage, and a gathering spot, makes it an indispensable element. But how is this sturdy piece of furniture tethered to the floor, ensuring it remains steadfast through years of bustling kitchen activity? Let’s take a step-by-step journey through the process of kitchen island attachment, uncovering the techniques that underpin its enduring stability.
The Foundation of Strength: Understanding Kitchen Island Attachments
The key to a secure and stable kitchen island lies in its attachment to the floor. This connection eliminates potential wobble and ensures the island remains steadfast even under the weight of heavy appliances or bustling gatherings.
Methods of Attachment: A Spectrum of Options
Several methods are employed to attach kitchen islands to the floor, each with its unique advantages and considerations:
- Screws and Brackets: A straightforward approach, this method uses screws to attach brackets to the island’s base, which are then secured to the floor’s subfloor. It’s a simple, cost-effective method suitable for lighter islands.
- Lag Screws: These robust screws are ideal for heavier islands. They are driven into the subfloor through holes pre-drilled in the island’s base, providing a sturdy and durable connection.
- Concrete Anchors: For islands with a heavy countertop, concrete anchors offer superior strength and durability. They are inserted into pre-drilled holes in the subfloor and secured with epoxy resin, creating a robust and permanent bond.
- Cleats: These wooden or metal strips are attached to the island’s base and to the subfloor, providing a wide surface area for support. These provide excellent stability and are often employed for islands with significant weight.
- Adjustable Legs: While not considered a true attachment method, adjustable legs allow for precise leveling and adjustments, ensuring stability despite uneven floors.
Material Matters: Considerations for Durability
The choice of materials for your island’s base and attachment method significantly impacts its durability and lifespan:
- Wood: A classic option, wood islands can be constructed from sturdy hardwoods like oak or maple, offering both beauty and durability. They are generally attached using screws, brackets, or cleats.
- Metal: Metal islands, typically crafted from steel or aluminum, boast exceptional strength and resilience. They are often attached using lag screws, concrete anchors, or cleats.
- Stone: Granite, marble, and quartz countertops lend an air of elegance to kitchen islands. They are often supported by metal or wood frames and attached using various methods depending on the construction.

Image: cozyhousetoday.com
Ensuring a Strong Bond: Installation Tips
The success of your island’s attachment relies on meticulous installation:
- Leveling is Key: Before attaching the island, use a level to ensure the floor is perfectly flat. Unevenness can lead to instability and stress on the attachments.
- Precise Measurements: Accurate measurements of the island’s base and the subfloor are crucial for a secure fit.
- Pilot Holes: Always pre-drill pilot holes for screws and lag screws to prevent splitting the wood.
- Structural Support: Avoid attaching the island directly to drywall or thin subfloor. Ensure the attachment points are anchored into floor joists or subfloor reinforced with plywood.
Expert Insights: Building a Rock-Solid Island
Experienced contractors and kitchen designers emphasize the importance of selecting the appropriate attachment method for your specific island and floor construction. They advise meticulously planning the installation to ensure a secure and long-lasting bond.
“The attachment method needs to be chosen carefully, considering the weight of the island and the strength of the subfloor,” explains John Thompson, a seasoned kitchen designer with over 20 years of experience. “Overlooking these factors can lead to problems down the line.”
He further emphasizes the importance of professional installation: “While some DIYers might attempt to attach their island, it’s advisable to consult a professional for a more secure and long-lasting result.”
How Is A Kitchen Island Attached To The Floor
Taking the Next Step: Your Kitchen Island’s Success Story
Armed with this knowledge, you can approach your kitchen remodel with confidence. Whether you’re considering a traditional wooden island or a sleek stainless steel design, understanding the nuances of kitchen island attachments empowers you to make informed decisions.
Remember, a strong foundation ensures not just the stability of your kitchen island but also the longevity of your dream kitchen. With the right attachments, your island will stand as a testament to your culinary passion, a gathering place for shared meals and cherished memories for years to come.
But don’t stop here! Explore further resources, consult expert advice, and share your own insights on kitchen island attachments with the community. Together, we can build a collective knowledge base that helps everyone create truly remarkable kitchen spaces.


