Ever felt your Word documents were a bit…dull? Maybe the black bullets just aren’t cutting it, and you crave a splash of color to make your lists pop. Fear not, because changing the color of bullets in Microsoft Word is surprisingly simple. This guide will turn your bland bullets into a vibrant symphony of color, bringing a touch of personality and visual flair to your documents.

Image: www.officedemy.com
Imagine this: you’re working on a presentation about the top five reasons to travel to Hawaii. The default black bullets seem a bit, well, boring. It’s not exactly capturing the essence of tropical paradise. But what if you could use a bright, sun-kissed yellow for those bullets? Suddenly, your list feels fresh, inviting, and perfectly aligned with the theme of your presentation. This is the power of a simple color change, and it’s a trick that can elevate your documents from ordinary to extraordinary.
A Step-by-Step Guide to Colorful Bullet Points
Ready to inject some color into your life? Let’s explore the different methods of changing bullet colors in Word, from the straightforward to the more advanced:
1. The Quick and Easy Method: The Home Tab
The simplest way to change bullet colors lies within the familiar “Home” tab. Here’s the process:
- Select your bullets: Click on the text you want to format. You can select an entire list or just a single bullet point.
- Navigate to the “Font” group: Locate the “Font” group on the “Home” tab. It’s usually on the left side, near the “Paste” button.
- Click the “Font Color” dropdown: This icon looks like a small paint bucket. Clicking it will reveal a palette of colors.
- Choose your desired color: Select the color that best complements your document’s theme.
- Witness the transformation: Voila! The color of your bullets will instantly change, adding a touch of personality and zing to your list.
2. Customize Your Bullet Styles: Exploring Bullet Libraries
Word offers a range of built-in bullet styles, but sometimes you crave something more unique. Let’s delve into the power of bullet libraries:
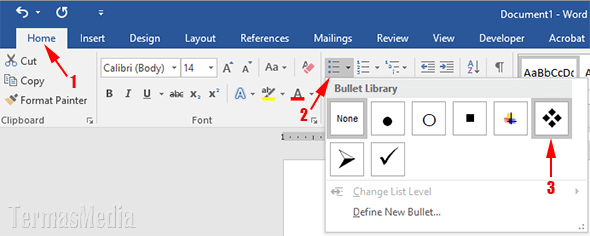
- Access the “Bullets and Numbering” dialog box: Click the “Bullets and Numbering” button in the “Paragraph” group on the “Home” tab. A pop-up window will appear.
- Explore the “Symbol” tab: In this tab, you’ll find a wealth of bullet options, including various shapes, symbols, and icons. Click on the “Symbol” button if you want to delve deeper into the character map.
- Choose your desired bullet: Select the bullet style that best suits your document.
- Modify the color: Click the “Font color” dropdown in the “Bullets and Numbering” dialog box to select a color for your chosen bullet.
- Apply the changes: Confirm your choices by clicking “OK.” Your new bullet style will be applied, showcasing your personal design flair.

Image: www.bank2home.com
3. Unleash Your Creativity: Create Custom Bullets
Feeling extra adventurous? You can even create your own custom bullets using images, shapes, or graphics:
- Insert your chosen image: Insert the image you want to use as a bullet point. It can be a simple shape, an icon, or even a small logo.
- Resize and position the image: Adjust the image’s size and place it next to the text of your list.
- Apply formatting: You can also change the size, color, or even add a drop shadow to your custom bullet.
- Copy and paste: This is the key to creating a consistent look across your entire list. Copy the image and paste it before each new bullet point, ensuring a visually appealing and unified style.
4. Advanced Options: Using Character Styles for Color Consistency
For a professional touch and bullet color consistency across multiple documents, explore Character Styles:
- Create a new Character Style: Go to the “Home” tab, click “Styles,” and select “New Style…”
- Name your style: Give your style a descriptive name, like “Colored Bullets.”
- Customize the color and bullet style: In the “Format” section of the “New Style” dialog box, you can change the font color, bullet style, and other attributes.
- Apply the style: Select the text in your list and click on the newly created “Colored Bullets” style. The color and bullet style will be applied in a single click, saving you time and ensuring consistency.
Expert Tips for Colorful and Engaging Bullet Points
Here are some expert tips to elevate your bullet points and make them truly stand out:
- Choose contrasting colors: Select colors that contrast well with your document’s background and text, improving readability and visual impact.
- Experiment with transparency: Use transparent colors to add subtle color accents to your bullets, creating visual interest without overpowering the text.
- Align your bullet colors with the document’s theme: If you’re writing about nature, try nature-inspired colors. For a scientific paper, consider subtle, professional shades.
- Keep it consistent: Use the same bullet color throughout a single document or project for a cohesive and polished look.
How To Change Color Of Bullets In Word
A Final Note on Bullet Power
Changing bullet colors is more than just a cosmetic update. It’s about creating a visually inviting and engaging experience for your reader. Just like a splash of color can transform a room, a touch of color in your bullet points can make your documents more impactful and memorable.
So go forth, experiment, and discover the power of colorful bullets! Your readers will thank you for the vibrant and engaging experience.


